If you’re new to 3D modeling, good UV mapping is critical to getting a good result for game output. With more complex scenes, you can end up with a lot of wasted space between the polygons in your UV map.
One of the most tedious parts of doing a good 3D model for game use is making a good UV map that doesn’t waste all that space. Producing a high-quality, efficient, UV map for a detailed model can take hours or days of work, depending on the complexity.
Enter iPackThat by Piranha Bytes, a tool that takes a ton of micromanagement off your to-do list, and smashes your polys into submission.
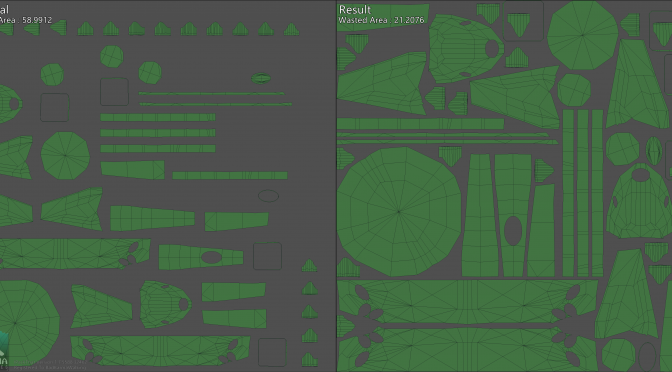
Below is a comparison image which shows what 3DS Max considers to be an acceptable default pack (without tweaking), and the same mesh, after iPackThat spent 2 minutes, 15 seconds crunching it.

That’s without any tuning of settings in iPackThat.
(Yes, it’s a mediocre, WIP, low-poly model. More on that later!)
The General settings tab allows you to do a variety of high level parameter tweaking, both controlling margins, step size, amount of area you want to use, the texture size and aspect ratio, etc. On this tab, you can also select how many processor threads to use for computation, and how many iterations you want it to run. (Want to let it run all night to find the best possible solution? Knock yourself out. Just make sure your computer has enough cool air coming in.)

The Cluster Settings tab lets you dive into the details more. Want to group your clusters for convenience in hand-painting, fine-tune rotation and scaling, or tell iPackThat to outright ignore certain clusters? That can all be done here.

Grouped polys are color-coded, making it clear what you’re looking at when you’re working with your model. It’s clear that the results below are less efficient, but if you need to group for hand-painting, it definitely works. (Below was the result of 15 minutes of computation on a laptop, or about 45 test iterations. The results may improve with longer runs, and would almost certainly improve with fine-tuning of the parameters)

File load support: FBX, DAE, OBJ, DXF, and 3DS.
File save support: FBX and FBX 6.0 (bin and ASCII), DAE, OBJ, and DXF.
Negatives? At my skill level, very few. A minor gripe: at release, the group scaling functionality scales around each cluster’s local origin instead of having an option to scale around the group origin. Counter to that gripe, the author is very responsive to feedback, and stated that this should be added in a future release.
To view his task tracking for the project, see this URL.
What does it look like in action? (I recommend playing at 2x)
See this link for the demo User Guide
Summary: If it wasn’t already obvious, yes, I like it. Even for someone who is as out-of-practice at 3D work as I am, it is a ridiculously handy tool for increasing the amount of pixels I can jam onto a UV map. As a matter of fact, I like it a lot, which brings us to…
THE CONTEST
Here’s the deal. Mario Röske, the developer, has given me three (3!) Steam keys for iPackThat to give away. As you’ve seen, my demo model is sorely lacking for showing off the power of this tool for detailed models. I want to see what you can do with this tool using the demo version available for free on Steam.
iPackThat has a built in screenshot button to give you the nice side-by-side images you see above.
Email me at geekfieldguide+iptcontest@gmail.com with the following images:
- Textured render of the final model
- Solid shaded wire render of the final model
- Before/After shot generated by iPackThat
Entries will be judged by myself and Sekrit Panel of Judges for best use of the tool and quality of the final work. Three winners will get a free Steam key for iPackThat. Winners will be announced in May.
Hi,
i was just wondering, if the e-mail adress is right?
it looks a bit odd with a “+” in the middle of it ^^
It is correct 🙂
That allows me to filter all contest entries into a folder easily.
Ah cool 🙂
And thank you for the contest 🙂 i already e-mailed you my entrie 🙂